Linguine Carbonara with Blue Cheese and Artichokes

This is my 100th post here at gourmetdaytoday! To celebrate this small milestone I am bringing you a recipe that really blew us away.
I love carbonara! Love it! I’ve used Nigella Lawson’s recipe for years but I have to tell you carbonara is finicky. Depending on the day the bacon may taste too strong, the eggs may scramble slightly if you don’t work quick enough or sometimes, at least for us, the salt is off. Well no more! I have no plans to make that recipe ever again. Why? This recipe is miles better, has better flavor and really fits the bill for an awesome tasting carbonara.
I found this recipe at Epicurious but have modified it quite a bit. You can find the original recipe here. One of the changes I made was adding asparagus to the pasta and it balanced the dish beautifully. I would definitely recommend adding the asparagus because the crunch was just perfect. This is a keeper in our house.
Enjoy!
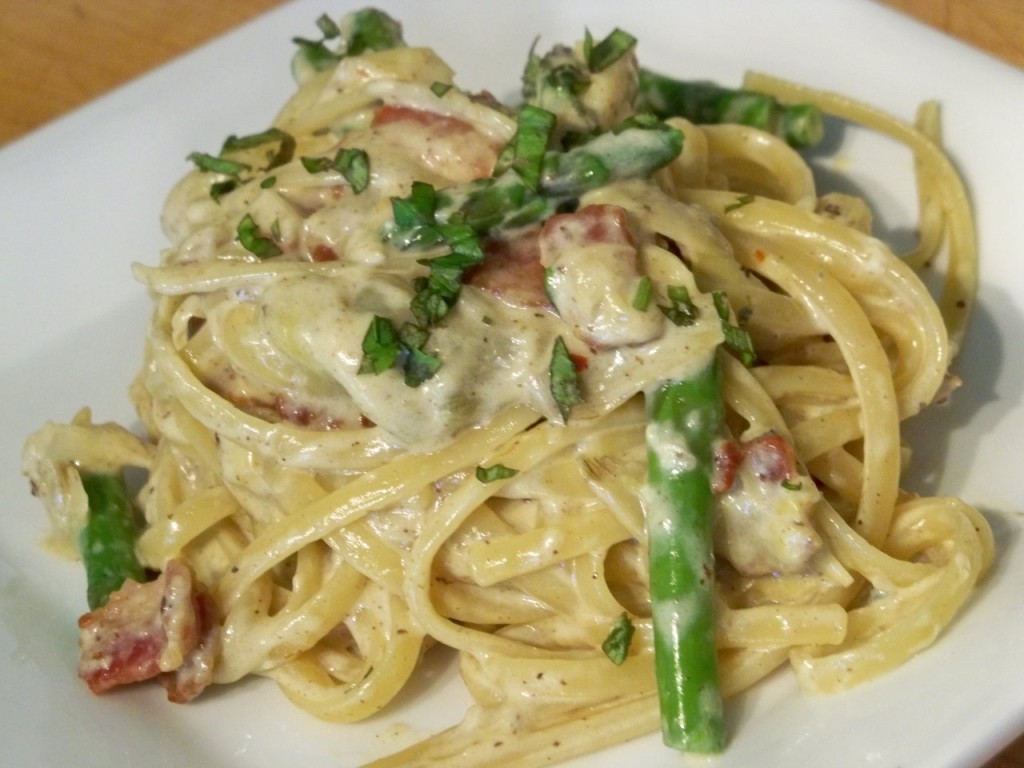
Linguine Carbonara with Blue Cheese and Artichokes

1 pound linguine
1/2 lb asparagus- trimmed and cut into thirds (or smaller if you have really long asparagus)

2 Tablespoons olive oil
3 garlic cloves, minced
2 8-ounce packages frozen artichoke hearts, thawed, quartered
1 cup crumbled blue cheese (gorgonzola would work here as well)
1 1/2 cups heavy cream
1/2 cup half and half
1/2 teaspoon dried crushed red pepper
1 teaspoon freshly ground black pepper
1/2 teaspoon salt

3 large eggs, beaten to blend
8 slices bacon, cut into 1-inch pieces
1 cup grated Parmesan cheese (about 3 ounces)
1 Tablespoon chopped fresh basil

Bring a large pot of salted water to a boil. You will need your water ready to add pasta while sauce is being made.

In a large pan or dutch oven, cook cut bacon until crispy. Remove from pan with slotted spoon. Add olive oil to pan with bacon grease and reduce heat to medium low. Add artichokes, then garlic and saute for 5 minutes. While artichokes are cooking, add pasta to pot of boiling salted water. Add 1/2 cup blue cheese, cream, half and half, crushed red pepper, black pepper and salt to the artichoke mixture and simmer until sauce thickens, about 5 minutes.
When you have about 3 minutes left of your pasta cooking time, add the asparagus to your pasta water. Finish cooking until pasta is tender but still firm to bite. Drain the linguine and asparagus well, reserving 1/2 cup pasta water.

Add hot pasta and asparagus to sauce and toss to coat. Remove from heat. Add eggs to pasta and toss well. Add bacon, 1/2 cup blue cheese, 1/2 cup Parmesan cheese and basil and toss to incorporate. Add reserved pasta water to thin sauce, if desired. Sprinkle 1/2 cup Parmesan cheese over pasta and serve.

Posted in General Announcements, Pork Dishes, Quick and Easy Recipes | 4 Comments

The Ultimate Sriracha Burger

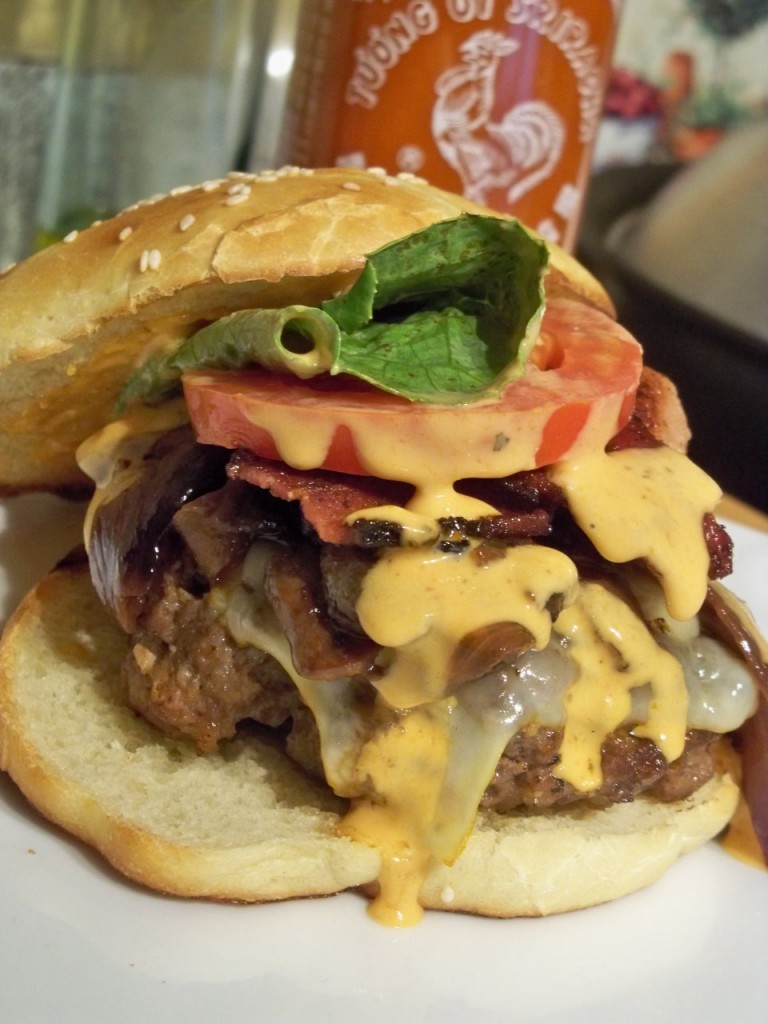
My husband was so happy to see this burger on our menu. It’s a burger centered around his favorite condiment in the world, Sriricha Chili Sauce. Sriricha is awesome. It’s a wonderful spicy chili sauce and has been a staple for years in our house.
This was such a great burger! It was a rainy day here in Florida so we opted not to grill the burgers. If you can grill them, by all means do but if you don’t have access to the grill or don’t have the time, I don’t think it’s necessary.
Now, I’m not gonna lie. This burger packs some heat. I always compare heat to buffalo wings because most everyone knows what kind of wings they can stand. With the recipe as it is, I would say it is a really hot medium or hot wing. You can adjust the heat by reducing the amount of Sriracha sauce, and the flavor will still be outstanding. I adapted the recipe to what I had on hand. I had 1/2 red onion and 1/2 sweet onion so I used that. I also added mushrooms and changed out the Swiss cheese to Munster cheese. Lastly, I added some grill seasoning to amp up the grill taste without having to grill. I served these tasty bad boys on some homemade brioche buns and they were perfect for the burger!
Give this burger a try!

Ultimate Sriracha Burger
First seen on Oishii, also on PreventionRD
*slightly adapted

1 1/2 lbs. ground chuck
2 TBS. soy sauce
2 teaspoons Grill Seasoning (I used Montreal steak seasoning)
4 TBS. Sriracha, divided
2 tsp. freshly ground black pepper
4 slices thick cut bacon
1 large sweet onion ( I used 1/2 red, 1/2 white – whatever you have will work!)
8 oz mushrooms, sliced
1/2 cup blue cheese dressing
4 brioche buns
4 thick slices Swiss cheese (I used Munster…again whatever you like)
1 tomato, sliced
several handfuls of arugula (I used romaine…)

In a large mixing bowl, combine the ground beef, soy sauce, 2 TBS. of the Sriracha, the grill seasoning and the pepper. Be careful not to overmix. Form the mixture into 4 patties, and set aside, on a parchment-lined plate, covered, in the refrigerator.

Preheat a charcoal or gas grill to medium high heat. In a medium frying pan over medium-low heat, cook the bacon, turning as necessary. While the bacon is cooking, peel and quarter the onions. Cut each section into 1/4-inch slices. Once the bacon is cooked through and slightly crispy, remove the slices from the pan, cut each in half crosswise, and drain onto paper towels, reserving the remaining bacon fat in the pan. Cook the sliced onions and sliced mushrooms in the bacon fat over medium-low heat until they caramelize, 20 to 25 minutes.
Grill the burgers, turning once, 4 to 4 1/2 minutes on each side or until a meat thermometer registers 130° to 135°F for medium-rare.
While the burgers are cooking, combine the blue cheese dressing with the remaining 2 TBS. Sriracha in a small bowl.
Lightly toast the buns on the grill during the last minute of cooking time.
Assemble the ultimate burger! Spread the blue cheese mixture on both halves of each hamburger bun. Stack a burger patty, slice of cheese, bacon, caramelized onions and mushrooms, slice of tomato, and your lettuce between each hamburger bun. Devour (not saying it’s easy)!

Posted in Beef Dishes, General Announcements, Quick and Easy Recipes | 2 Comments

German Chocolate Cheesecake

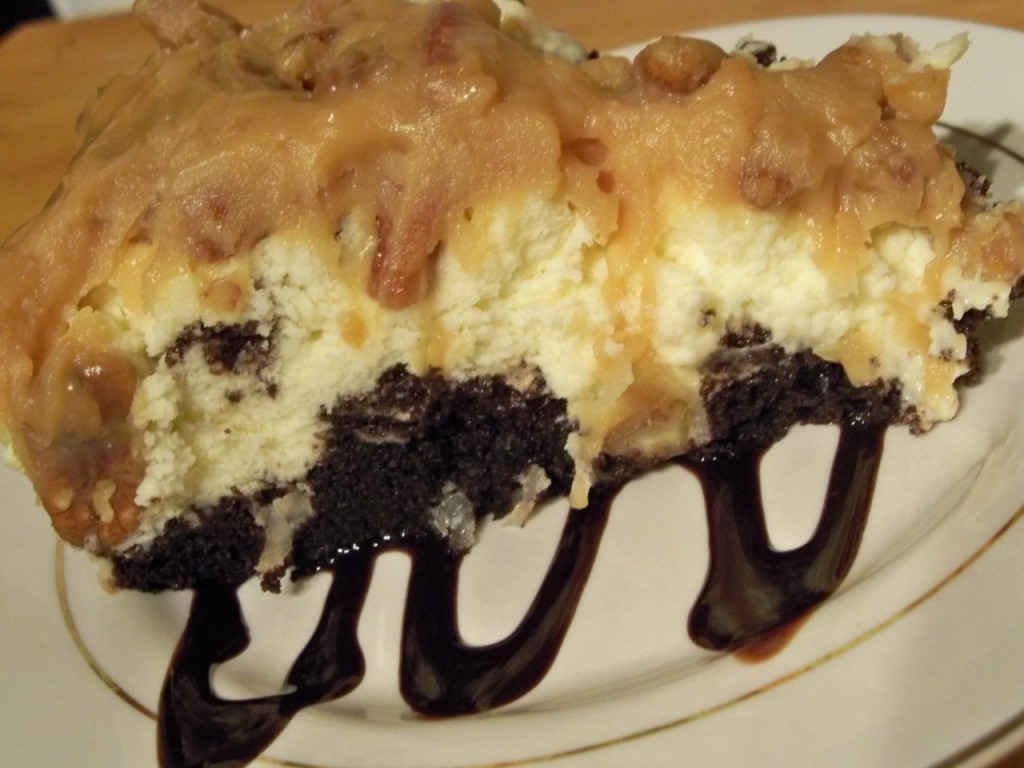
Oh Happy Day. Clouds parting, angels singing, Hallelujah and all that jazz. This cheesecake made me that happy!
My hubby had a birthday this week. When I asked him what kind of cake he would like he said he either wanted a German Chocolate Cake or a cheesecake. Why not have both? After figuring out that I wanted to make a German Chocolate Cheesecake, I needed to figure out how I was going to make it. After asking my chef in Baking Class how he would make it, I was ready to get to baking. I used the chocolate cake recipe I like (Hershey’s Dark Chocolate Cake) and the cheesecake recipe I like to use along with a fresh toasted coconut and warm pecan frosting. It turned out awesome. You really should try this cheesecake!
Enjoy!

Hersheys “Especially Dark” Chocolate Cake

Ingredients

2 cups sugar
1-3/4 cups all-purpose flour
3/4 cup HERSHEY’S SPECIAL DARK Cocoa
1-1/2 teaspoons baking powder
1-1/2 teaspoons baking soda
1 teaspoon salt
2 eggs
1 cup milk
1/2 cup vegetable oil
2 teaspoons vanilla extract
1 cup boiling water

Directions

1 Heat oven to 350°F. Grease and flour two 9-inch round baking pans.
2 Stir together sugar, flour, cocoa, baking powder, baking soda and salt in large bowl. Add eggs, milk, oil and vanilla; beat on medium speed of mixer 2 minutes. Stir in boiling water (batter will be thin). Pour batter into the prepared pans.
3 Bake 30 to 35 minutes or until wooden pick inserted in center comes out clean. Cool 10 minutes; remove from pans to wire racks. Cool completely.

For the Cheesecake

New York Cheesecake
Source: On Cooking 5th Edition
Inspiration for Assembly: Chef Jason S.
Slightly adapted to include directions for assembly

24 oz cream cheese room temperature
7 oz granulated sugar
4 eggs
1 oz cake flour or corn starch
1/2 Tablespoon vanilla extract
3/4 Teaspoon lemon zest, grated fine
7 fl. oz heavy cream

Before making cheesecake, first start the assembly of your crust.
Take cooled chocolate cake (removed from pans). Cut one of the cakes in half to make two thin discs. Set one disc aside. Place one disc of chocolate cake in the bottom of a greased 9 inch spring form pan. Cube up second disc and part of second cake round and make one layer of the cubes over cake “crust”. The cheesecake batter will coat the cubes of cake and also run down between them.
P.S. You will have extra cake left- I made a trifle from mine. You can make this your snacking cake if you like. 🙂
Now you can make your cheesecake batter.
Preheat the oven to 300 F
Blend the cream cheese and sugar on low speed in the bowl of a mixer fitted with the paddle attachment until no lumps remain. Scrape down the bowl often.
Add the eggs, one at a time, waiting for each egg to be fully incorporated before adding more. Scrape down the bowl.
Add the flour and mix until combined. Add the remaining ingredients (vanilla extract, lemon zest and heavy cream). Mix well to blend.
Pour the cheesecake over the crust and cake cubes.
Place cheesecake on middle rack of oven. Place another large empty pan in the rack below the cheesecake and fill that pan 1/2 way up with hot water. Bake until the batter is set and no longer trembles, approx 75-90 minutes. Do not open the oven! My cheesecake took about 80 minutes. Once the cheesecake is baked, turn off the oven and open the door, leaving the cake on the rack. After 30 minutes, remove cheesecake. Refrigerate to set.

Now last but not least prepare your frosting!

German Chocolate Cake Frosting
*slightly adapted

Ingredients
1 cup evaporated milk
1 cup white sugar
3 egg yolk, beaten with 1 teaspoon water
1/2 cup margarine
1 teaspoon vanilla extract
1 cup chopped pecans
1 cup flaked coconut

Directions
1. In a large saucepan combine evaporated milk, sugar, egg yolks, margarine and vanilla. Cook over low heat, stirring constantly, until thick.
2. Toast pecans and coconut in a dry pan over medium heat until the coconut begins to brown and the pecans and coconut become fragrant.
3. Remove from heat and stir in pecans and coconut to thickened mixture. Allow frosting to cool 15-20 minutes. Stir every 5 minutes or so. I left my frosting out and did not put it in the fridge so it would be easier to frost later.

To Frost: Gently remove spring form pan from cheesecake. Spread cooled frosting over cheesecake before serving.

Prepare for heaven people. Prepare for heaven.

Posted in Desserts, General Announcements | 3 Comments

Menu: 8/7-8/13

Well this week we are starting to get back to normal around our house. We are trying some new dishes this week along with some of the old favorites. I am really excited to try The Ultimate Sriracha Burger. It has been raved about on several blogs I follow. I think its going to be a good week in the kitchen!

Sunday: Pizza with friends

Monday: Sushi with hubby!

Tuesday: Ultimate Sriracha Burger with these brioche buns and oven fries

Wednesday: Shrimp and Grits with a side salad.

Thursday: Roll over from last week. Linguine Carbonara with gorgonzola cheese.

Friday: Buffalo Chicken Strips and crash hot potatoes

Saturday: Spicy spinach stuffed chicken and creamy orzo

Posted in Menu Plan Suggestions | Comments Off on Menu: 8/7-8/13

Soy Lime Pork Tenderloin

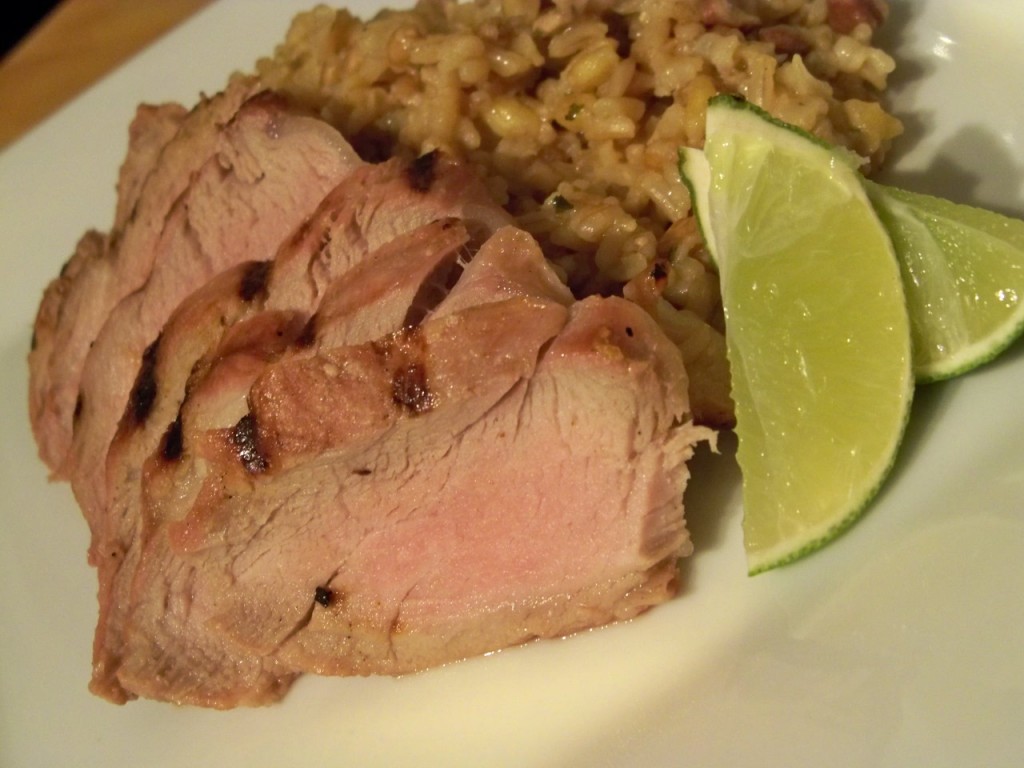
Like the rest of the country it is hot here in Florida! Unlike the rest of the country it rarely gets really cold here so recipes for grilling are always great for us. Who wants to turn on the oven in this heat? I found this great recipe for Soy Lime Pork Tenderloin at So Tasty So Yummy and I’m thankful I did. The marinade is simple and can be done a day ahead, so when it comes time to eat it’s easy.
Also, in her recipe So Tasty So Yummy recommends you cook the pork to an internal temperature of 160 degrees. If you prefer your pork completely white all the way through then go ahead and follow this. I prefer my pork blushing in the center. The USDA has recently lowered the recommended internal temperature for whole pork products to 145 degrees, so use your discretion. The photo below shows pork cooked to 145.
Enjoy!

Soy Lime Pork Tenderloin

2 Limes
2 Tablespoons wine or white vinegar
2 Tablespoons vegetable oil
1 Tablespoon reduced-sodium Soy Sauce
1 Tablespoon honey
2 Cloves garlic
½ Teaspoon dried red pepper flakes
1 ½ -2 lbs. Pork Tenderloin

Marinade
Cut limes in ½ and squeeze juice in a 2 cup measure. Add vinegar, vegetable oil, soy sauce and honey. Peel and mince garlic and add to measure. Add the red pepper flakes. Whisk the mixture to blend honey.
Place meat in self sealing plastic bag and pour the marinade over the meat. Scrape out any honey that clings to the measure. Seal and refrigerate a day ahead of time.

Grill
Heat gas grill on high. Cook 6 minutes and rotate the meat _ turn. Cook 6 minutes more and rotate _ turn so all sides are brown. Cook 8 – 10 minutes longer until internal temperature is 160°. Serve at once or refrigerate until ready to serve.

Posted in General Announcements, Pork Dishes, Quick and Easy Recipes | 4 Comments

Saucy Garlic Chicken

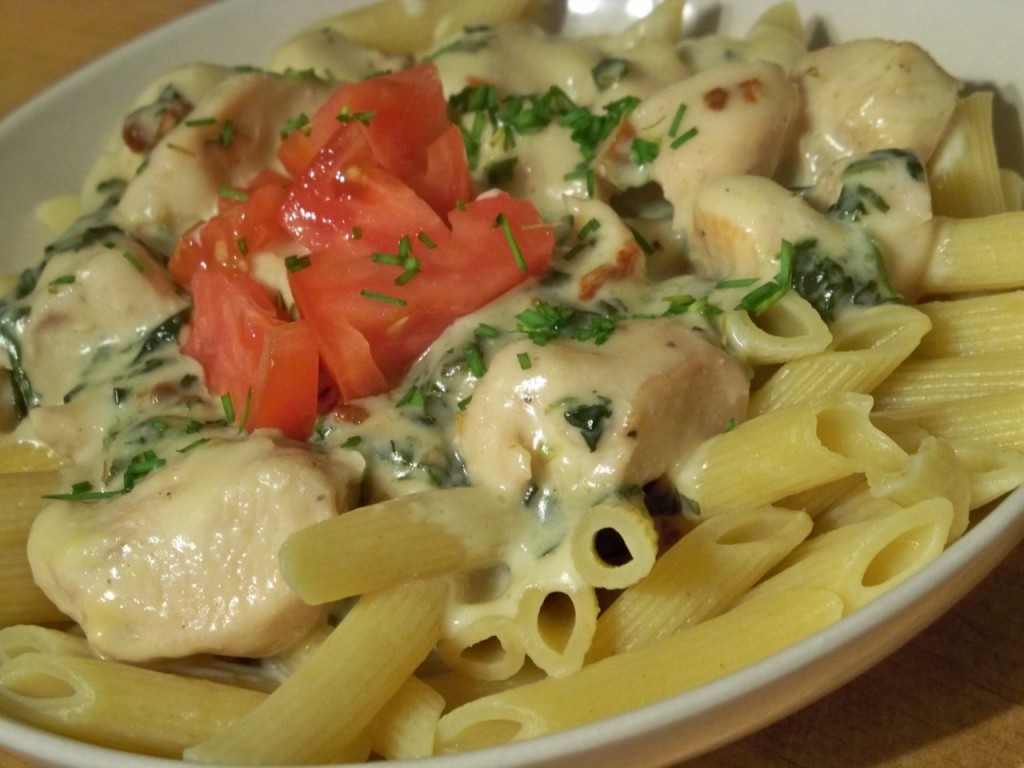
Wow. What a great dish! Of course, with a name like “saucy garlic chicken” you can’t really go wrong. Before making this dish, I had never made a pasta dish where the sauce was baked without the pasta in it. I prefer it this way actually. The pasta was perfectly al dente and that’s because I didn’t have to mess around with my boiled pasta time to account for baking in the oven. One less thing to think about if you ask me. 🙂
I don’t like to exaggerate (well…maybe) but this sauce was pretty incredible. The recipe called for 4 whole bulbs of garlic, but I had just bought a huge jar of peeled whole garlic cloves so I used 40 of those instead. I guessed that each bulb has about 10 cloves of garlic. It sounds totally excessive but goodness was it delicious. To save yourself some time, roast the garlic ahead of time, this can be done a few days ahead or even the night before.
I also added sun-dried tomatoes to the recipe because I have a huge jar of those I needed to use up as well.
A big thanks to A Taste of Home Cooking for putting this recipe on my radar!

*A taste of home cooking said that she would try the chicken in bite sized pieces next time she makes it and I totally thought the same thing when I saw the recipe. Plus, hubby likes it that way, it’s less work to eat.

Saucy Garlic Chicken
Taste of Home Magazine

4 whole garlic bulbs (or 40 cloves)
2 tablespoons olive oil, divided
9 oz fresh baby spinach ( I used a 10 oz package frozen chopped spinach defrosted and drained)
4 tablespoons chopped sun-dried tomatoes
3/4 teaspoon salt, divided
1/2 teaspoon coarsely ground pepper, divided
6 boneless skinless chicken breast halves – cut into bite sized pieces
6 tablespoons butter, cubed
6 tablespoons all-purpose flour
3 cups 2% milk
2 1/2 cups grated Parmesan cheese, divided
1/8 teaspoon nutmeg
Hot cooked pasta
Chopped tomato and minced fresh parsley, optional

Remove papery outer skin from garlic (do not peel or separate cloves). Cut tops off of garlic bulbs; brush bulbs with 1 tablespoon oil. Wrap each bulb in heavy-duty foil.
**If you are using individual cloves, place on a foil sheet, cover with oil, pinch foil up on sides and across the top to seal shut. Bake at 425° for 30-35 minutes or until softened. Cool for 10-15 minutes.

Meanwhile, place spinach in a greased 13-in. x 9-in. baking dish; sprinkle with 1/4 teaspoon each of salt and pepper. Top spinach with sun-dried tomatoes.

In a large skillet, saute chicken with remaining oil; place over spinach.

In a large saucepan, melt butter. Stir in flour until smooth; gradually add milk. Bring to a boil; cook and stir for 1-2 minutes or until thickened. Stir in 2 cups cheese, nutmeg and remaining salt and pepper. Transfer to a blender; squeeze softened garlic into blender (or if you used individual cloves, just toss them in, don’t forget the oil that is flavor!) Cover and process until smooth. Pour mixture over chicken.

Cover and bake for 30-35 minutes until sauce is bubbly. Uncover; sprinkle with remaining cheese. Bake 5 minutes longer. Serve with pasta. Sprinkle with tomato and parsley if desired.

Posted in Chicken Dishes, General Announcements | 9 Comments

Menu: 7/31-8/6


This past week was a cooks nightmare! Ugh. I only had the opportunity to prepare one item on my menu plan from last week. We had something come up last-minute every night during the week , so most nights we had to heat up some leftovers, pack a sandwich or grab something on the road. I am determined that this week will be different! 🙂

Sunday: Birthday Dinner with the family for my hubby (and his mom and grandma!)

Monday: Grilled Chicken with this yummy Caesar Salad

Tuesday: Soy Lime Pork Tenderloin, Brown Rice Pilaf and roasted broccoli.

Wednesday: Saucy Garlic Chicken over pasta.

Thursday: My husbands birthday! I am planning a food extravaganza with all of his requests. I can not wait to blog this meal!

Friday: Fettuccine Carbonara with Gorgonzola.

Saturday: Yet another birthday party but this time for a sweet friend! Yay Ethan!

Posted in Menu Plan Suggestions | Comments Off on Menu: 7/31-8/6